Contents
Introduction and recap of Part 1
Welcome back to our journey into Visual AI Engineering with PyFlyde! In this second part of our tutorial, we’ll dive deeper into the fascinating world of AI and data engineering, combining modern tools and libraries with the intuitive power of visual programming.
In Part 1 of this tutorial, we embarked on an exciting journey to build a flexible data extraction flow. We successfully created a web scraper that fetches articles from the Software Leads Weekly newsletter, cleans them up, and saves them as local Markdown files. Here’s the Flyde flow that we have implemented:

Throughout the first part, we learned how to:
- Create visual flows with Flyde in VSCode
- Code Flyde nodes in Python using PyFlyde
- Utilize BS4, Playwright, and Markdownify to scrape a website
- Run, update, and optimize our flow
In this part, we will take our project to the next level by transforming the scraped content into a powerful Retrieval Augmentation Generation (RAG) system. We will leverage LangChain, a vector database, LLaMA3, and Flyde to seamlessly integrate these components. By the end of this tutorial, you will have a comprehensive understanding of how to build advanced AI engineering workflows using visual programming tools.
So, let’s get started and unlock the full potential of our data with PyFlyde!
Prerequisites for this tutorial part
Before we proceed, ensure you have the following:
- Python 3.10 or newer
- Basic Python programming experience
- Visual Studio Code with the Flyde extension
- Basic knowledge of LLMs and data processing (helpful but not required)
- A GPU or Apple Silicon chip with enough RAM to run an LLM locally, or an API key for OpenAI or another LLM of your choice
Here are some useful links to the tools and libraries we will use:
- Flyde - a visual programming tool and VSCode extension.
- PyFlyde - a Python library and runtime for Flyde.
- Ollama - the easiest way to run LLMs on your local machine.
- LangChain - an abstraction over LLM-related libraries.
Installing dependencies
You can checkout the code of the project from the SWLWi Github repo.
Here is the updated dependencies section of our pyproject.toml:
dependencies = [
    "beautifulsoup4 >= 4.0.0, < 5.0.0",  # HTML parsing
    "chardet >= 5.0.0, < 6.0.0",
    "langchain ~= 0.3.0",                # LLM abstraction layer
    "langchain-community ~= 0.3.2",      # Community packages for LangChain, including SQLiteVec
    "langchain-huggingface ~= 0.3.0",    # HuggingFace model loader and API
    "langchain-core ~= 0.3.0",           # Core
    "langchain-ollama ~= 0.3.0",         # Ollama wrapper
    "langchain-openai ~= 0.3.0",         # OpenAI API wrapper
    "langchain-text-splitters ~= 0.3.0", # Needed for chunking
    "markdownify ~= 1.1.0",
    "playwright >= 1.0.0, < 2.0.0",
    "pyflyde ~= 0.1.0",                  # Flyde runtime for Python
    "requests >= 2.0.0, < 3.0.0",
    "sentence-transformers ~= 4.1.0",    # Needed to create embeddings
    "streamlit ~= 1.46.0",               # Simple web UI
    "sqlite-vec ~= 0.1.0",               # Vector Store on top of SQLite
]
To enter the Python virtual environment and install all the dependencies at once, run this command in thr project directory:
source .venv/bin/activate # On Windows: .venv\Scripts\activate
pip install .             # Install the dependencies
Next, let’s get our LLM ready. If you haven’t installed Ollama yet, now is the good time. With Ollama on board, we can install our LLaMA3.2-3B model in the terminal:
ollama run llama3.2
Ollama will download the model, install it, and run automatically. You can enjoy a conversation with it right away in your CLI, or say /bye to exit and get back to coding.
Note on alternative LLMs
The llama-3.2 is a relatively small model with 3 billion parameters, requiring just ~1GB of VRAM. It works fast on an Apple Silicon Mac or a relatively inexpensive discrete GPU.
If you want to try a slightly slower but larger model, you can run:
ollama run phi4
Phi-4 is a 14 billion parameter optimized model from Microsoft. It needs 2GB of VRAM and works slightly slower than llama-3.2-3b.
No GPU? No problem. You can still use an LLM in the cloud. For example, if you want to use OpenAI chat, you can use LangChain’s OpenAI wrapper. We will cover it in more detail later in this article.
So you need a RAG…
Our goal for today is to build a simple Retrieval-Augmented Generation (RAG) model using LLaMA3 (or a similar Large Language Model), Langchain, and SQLiteVec. We will leverage the LLaMA3/OpenAI model to generate text based on the input we provide and use SQLiteVec to store the vectors of the text data we have scraped.
What is Retrieval-Augmented Generation (RAG)?
Retrieval-Augmented Generation (RAG) is a technique that enhances the capabilities of a standard Large Language Model (LLM) by incorporating external knowledge from a specific document database. This approach does not involve changing or retraining the LLM itself; instead, the LLM is used as-is. The key idea is to perform a search on the document database first and then insert the relevant documents into the LLM’s context before generating a response.
How does RAG Work?
RAG consists of four steps:
- Document database: first, you need a database of documents. These documents are pre-processed and stored in a way that makes them easy to search. In our case, we will use SQLiteVec to store the vectors of the text data we have scraped.
- Search and retrieval: when a query is made to the LLM, a search is performed on the document database to find the most relevant documents. This search can be based on various techniques, such as keyword matching or vector similarity. We are going to use vector similarity search, turning the text into vector embeddings.
- Context insertion: the retrieved documents are then inserted into the context of the LLM. This means that the LLM will consider these documents when generating its response.
- Response generation: finally, the LLM generates a response based on the input query and the additional context provided by the retrieved documents.
When to use RAG
Here are some benefits of using RAG technique:
- Enhanced knowledge: RAG allows the LLM to access and utilize information that is not part of its pre-trained knowledge base. This is particularly useful for domain-specific applications where the LLM needs to be aware of specialized or up-to-date information.
- Cost-effectivess: retraining a large language model is both time-consuming and expensive. With RAG, you can update the document database without needing to retrain the model. This means you can keep the LLM’s responses current with new information simply by updating the database.
- Scalability: RAG can handle large volumes of documents. Instead of embedding all possible knowledge into the LLM, which is impractical, RAG allows the model to dynamically retrieve and use relevant information from an external source.
It has certain limitations though:
- Quality of documents: the effectiveness of RAG is highly dependent on the quality and relevance of the documents in the database.
- Search implementation: the search mechanism needs to be efficient and accurate to retrieve the most relevant documents.
- Context space: the retrieved documents occupy space in the LLM’s context, which is already limited. This means there is a trade-off between the amount of additional context and the complexity of the input query.
Now that we have better understanding of what RAG is, it’s time to proceed to implementing it.
Indexing documents and saving them in a Vector Store
Currently, we have our Knowledge Base saved on disk as Markdown files in issue subfolders. Unfortunately, an LLM cannot magically work with our local Markdown files. We need to turn our Markdown articles into a searchable database first. This process is called indexing, and we’ll implement it as the Index.flyde flow:
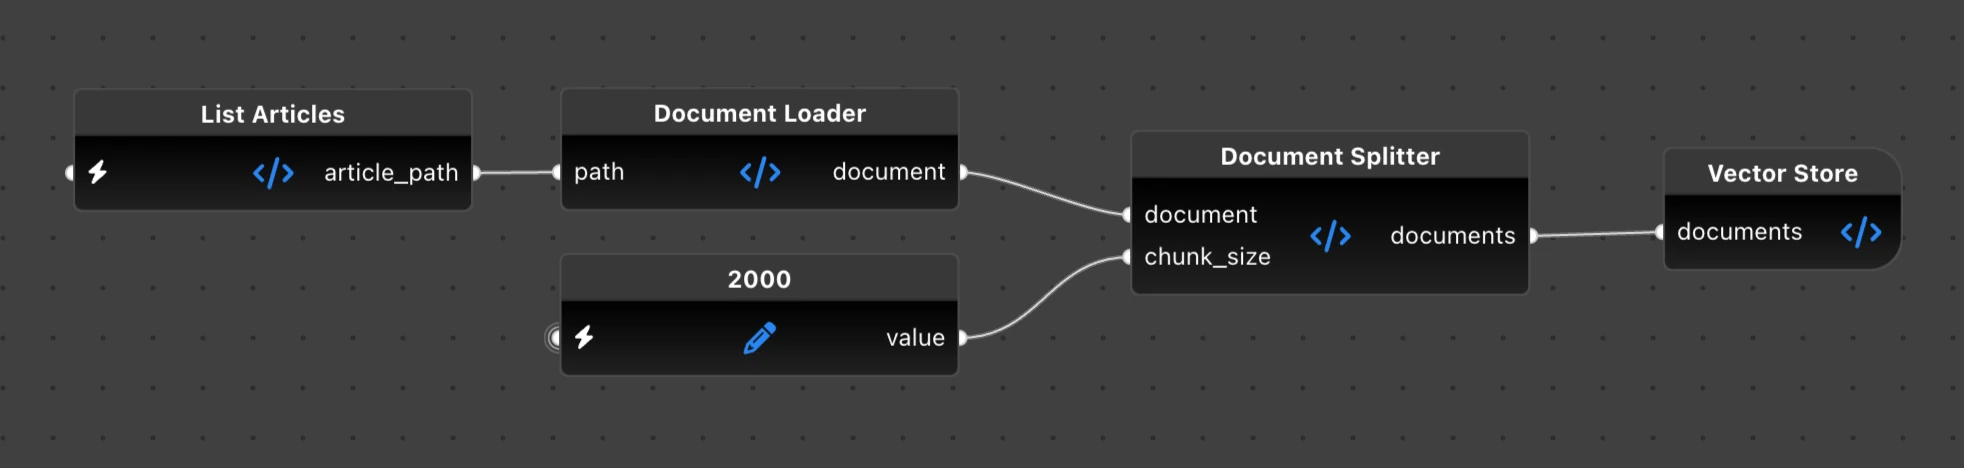
For RAG to work, we first need to create a searchable document index in a vector store. A vector store is a database that treats data chunks as vectors of numbers, allowing it to easily find similarities between different documents and query inputs. It does not work well with large bodies of plain text out of the box, so we will have to do two things before we store our articles in a vector store:
- Split the articles into smaller chunks. This makes it easier to find relevant pieces and ensures they do not occupy too many tokens in the LLM’s context.
- Encode the plain text chunks into embeddings—a representation the vector search can understand.
There are plenty of dedicated vector stores available, but in our app, we will use one of the quickest options that doesn’t require running a separate database server — sqlite-vec. Yes, you guessed it, it’s a vector search on top of SQLite.
Now that we have an idea of the data flow, we can move on to coding some Python nodes.
Implementing the indexer nodes
For the RAG part, we will create another Python module swlwi/rag.py.
We are going to use LangChain as an abstraction over various chunking, embedding encoder/decoder methods and models, as well as a vector store.
ListArticles component
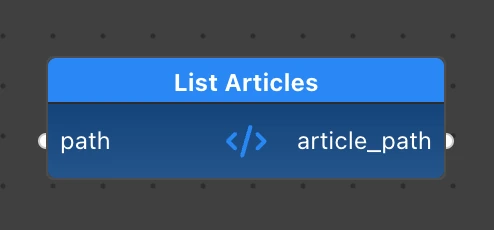
The ListArticles component is pretty straightforward. It lists all the Markdown files across all issues that we scraped with the scraper flow. To do that, it goes over all issue- folders in the index and gets paths of all *.md files inside them.
class ListArticles(Component):
    """Lists all articles in the index."""

    inputs = {"path": Input(description="Path to the index", type=str, mode=InputMode.STICKY, value="./index")}

    outputs = {"article_path": Output(description="Stream of paths to articles", type=str)}

    def process(self, path: str) -> None:
        for issue in os.listdir(path):
            # Skip folders that don't start with 'issue-'
            if not issue.startswith("issue-"):
                continue
            issue_path = os.path.join(path, issue)
            for article in os.listdir(issue_path):
                # Skip files that don't end with '.md'
                if not article.endswith(".md"):
                    continue
                article_path = os.path.join(issue_path, article)
                self.send("article_path", article_path)
        # Send EOF when finished listing
        logger.info("Finished listing articles")
        self.stop()
DocumentLoader component
The DocumentLoader reads the contents of a Markdown file from the specified path and converts it into a LangChain Document.
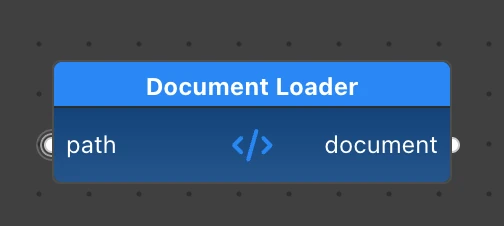
The Markdown content is saved in the page_content of the document, which will be used to search and return the text.
Other attributes such as the title, source URL, reading time, and summary are saved as metadata. We won’t necessarily use them in the first version, but we may need some of them to implement extra functionality in the future.
from langchain_core.documents import Document # add this to imports


class DocumentLoader(Component):
    """Loads Markdown from file as a Langchain Document."""

    inputs = {"path": Input(description="Path to the markdown file", type=str)}

    outputs = {"document": Output(description="Langchain Document", type=Document)}

    def process(self, path: str) -> dict[str, Document]:
        logger.info(f"Loading document from {path}")
        with open(path, "r") as f:
            text = f.read()

        # Parse header
        header = text.split("\n---\n")[0]
        lines = header.split("\n")
        title = lines[0].strip("# \t\r\n")
        lines = lines[1:]
        source_url = ""
        reading_time = ""
        summary_lines = []

        for line in lines:
            if line.startswith("Source:"):
                source_url = line.split("(")[-1].strip(")")
            elif line.startswith("Reading time:"):
                reading_time = line.split(":")[-1].strip()
            else:
                summary_lines.append(line)

        summary = "\n".join(summary_lines).strip()

        doc = Document(
            page_content=text,
            metadata={
                "path": path,
                "title": title,
                "source_url": source_url,
                "reading_time": reading_time,
                "summary": summary,
            },
        )
        logger.info(f"Loaded document: {title} from {path}")
        return {"document": doc}
DocumentSplitter component
The next node, DocumentSplitter, uses LangChain’s MarkdownDocumentSplitter to split each Document into smaller Document chunks of a specific size.
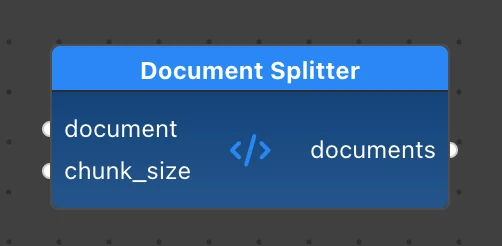
The MarkdownTextSplitter from LangChain knows how to split our source document into chunks of up to chunk_size characters. We set chunk_overlap so that these chunks overlap slightly, increasing the probability of having enough context for the request.
from langchain_text_splitters import MarkdownTextSplitter


class DocumentSplitter(Component):
    """Splits markdown documents into chunks."""

    inputs = {
        "document": Input(description="Document to split", type=Document),
        "chunk_size": Input(description="Size of each chunk", type=int, mode=InputMode.STICKY, value=2000),
    }

    outputs = {"documents": Output(description="Chunks of text")}

    def process(self, document: Document, chunk_size: int) -> dict[str, list[Document]]:
        splitter = MarkdownTextSplitter(chunk_size=chunk_size, chunk_overlap=50)
        texts = [document.page_content]
        metadatas = [document.metadata]
        documents = splitter.create_documents(texts, metadatas)
        logger.info(f"Split document {document.metadata['path']} into {len(documents)} chunks")
        return {"documents": documents}
For each input document, the DocumentSplitter sends a list of documents. Therefore, our next node, VectorStore, should be designed to handle this type of input.
VectorStore component
We are going to create our VectorStore component as a wrapper around the SQLiteVec class from LangChain. This component will only add new documents to the store. Unlike conventional Repository classes in object-oriented programming, in flow-based programming, a node typically has just one main function. For example, document search will be a different component.
However, we need to ensure the SQLiteVec store itself stays in memory all the time and we don’t recreate it on every new input. That’s why we will implement an _init() method which initializes the store only once.
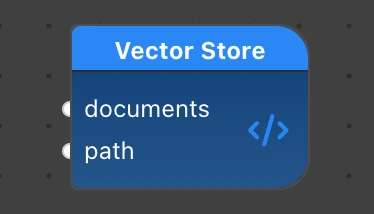
While process() is called on every new input list of documents, we call _init() inside of it to ensure the embeddings encoder and the SQLiteVec instance are created once.
from langchain_huggingface import HuggingFaceEmbeddings
from langchain_community.vectorstores import SQLiteVec


class VectorStore(Component):
    """Stores documents as vectors in a vector store."""

    inputs = {
        "documents": Input(description="Documents to store"),
        "path": Input(description="Path to the vector store", type=str, mode=InputMode.STICKY,
            value="./index/vectors"),
    }

    def _init(self, path: str):
        if not hasattr(self, "_embeddings"):
            logger.info("Loading embeddings")
            self._embeddings = HuggingFaceEmbeddings(model_name="all-MiniLM-L6-v2")
        if not hasattr(self, "_vector_store"):
            logger.info("Creating vector store")
            # Create path if not exists
            os.makedirs(path, exist_ok=True)
            self._vector_store = SQLiteVec(
                table="swlwi_embeddings", connection=None, db_file=f"{path}/db.sqlite3", embedding=self._embeddings
            )

    def process(self, documents: list, path: str):
        logger.info(f"VectorStore Processing {len(documents)} documents")
        self._init(path)
        logger.info(f"Adding {len(documents)} documents from {documents[0].metadata['path']} to the vector store")
        try:
            self._vector_store.add_documents(documents)
        except sqlite3.OperationalError as e:
            if "UNIQUE constraint failed" in str(e):
                logger.info("Some documents already exist in the vector store, skipping duplicates")
            else:
                # Re-raise if it's a different error
                raise
As you see in the code, our vector store needs a HuggingFaceEmbeddings object to perform vector searches on the documents. What does this Embeddings object do? When we store new documents, it converts text sentences into searchable vectors. When we query the store, it translates the query into an embedding vector as well. Then the store can perform similarity searches among vectors.
Since we use Ollama, it might be tempting to assume that we need to use Ollama Embeddings in the vector store, as LangChain provides it. However, we are only going to use these embeddings to perform the search and retrieval of documents; we are not going to send these embeddings to LLaMA, as LLaMA receives our prompt as plain text. And since Ollama’s embeddings encoder is quite slow, we are using a much simpler all-MiniLM-L6-v2 model, which is much faster and sufficient for our needs.
Running the flow
With all the components implemented, we make them available in Flyde by updating flyde-nodes.json with:
pyflyde gen .
Next, create a new Index.flyde visual flow with Flyde in VSCode. Wire the nodes together as shown in the diagram at the beginning of this section.
Then, run it to index our article database:
pyflyde Index.flyde
This creates an SQLite database file in our index folder. We will use it in the next section to perform actual Retrieval Augmented Generation.
Retrieving documents into LLM’s context
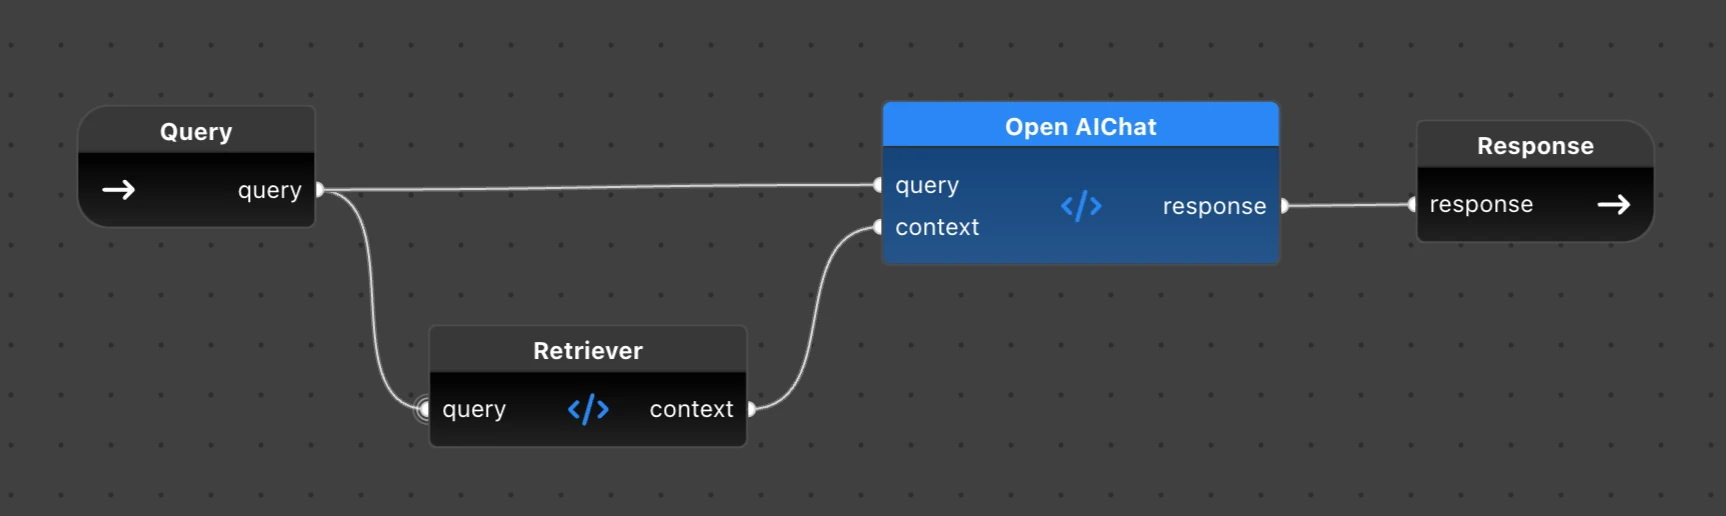
Once we have populated the database with vectors of chunked documents, the actual retrieval of documents relevant to a search query and embedding of the search results into LLaMA’s prompt is quite simple:
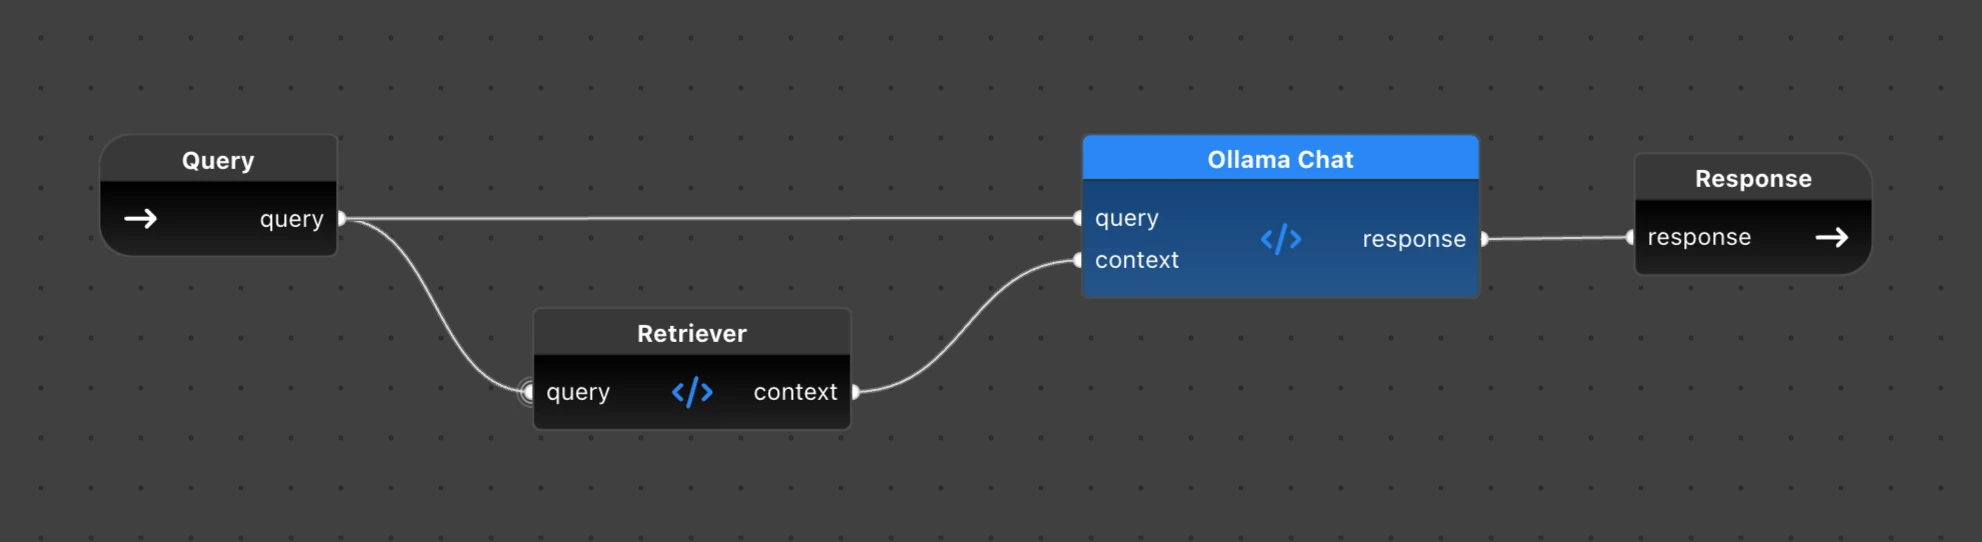
Our Rag.flyde is different from Index.flyde and Scrape.flyde in that it is not designed as a standalone flow that you can just run with pyflyde. It is meant to be embedded in another flow or Python program. That’s why you see Query as the flow input and Response as the flow output on the above diagram.
This was intentional because we want to build the UI in a more conventional way and just embed Rag.flyde in that application. The next section shows how we can do it.
Retriever component
We provide the same path to the vector DB to the Retriever as an inline value. The query input comes from outside the flow, and the response output is used to send the results. There is no UI to get the query and display the results in this flow yet, because we are actually going to integrate it into an external Streamlit application in the next section.
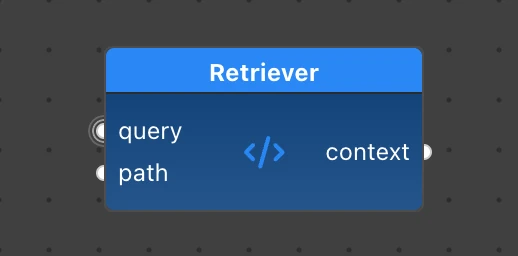
The Retriever implements the reader part of the vector store and reuses the same vector store logic for initialization. In addition, it uses LangChain’s as_retriever() interface to perform the actual retrieval of matching documents.
class Retriever(Component):
    """Retrieves context from a vector store."""

    inputs = {
        "query": Input(description="Query text", type=str),
        "path": Input(description="Path to the vector store", type=str, mode=InputMode.STICKY,
            value="./index/vectors"),
    }

    outputs = {"context": Output(description="Context retrieved from the vector store", type=str)}

    def _init(self, path: str):
        if not hasattr(self, "_embeddings"):
            self._embeddings = HuggingFaceEmbeddings(model_name="all-MiniLM-L6-v2")
        if not hasattr(self, "_vector_store"):
            logger.info(f"Opening vector store with path {path}/db.sqlite")
            self._vector_store = SQLiteVec(
                table="swlwi_embeddings", connection=None, db_file=f"{path}/db.sqlite3", embedding=self._embeddings
            )
        if not hasattr(self, "_retriever"):
            self._retriever = self._vector_store.as_retriever()

    def process(self, query: str, path: str) -> dict[str, str]:
        self._init(path)

        docs = self._retriever.invoke(query)

        logger.info(f"Retrieved {len(docs)} documents from the vector store for query '{query}'")

        if not docs:
            return {"context": ""}

        context = "\n\n".join([doc.page_content for doc in docs])
        return {"context": context}
The Retriever retrieves documents (or chunks of articles, to be more precise) that match the query. It then combines them into a context for the prompt using simple concatenation.
OllamaChat node
Finally, let’s look at our LLaMA wrapper component:
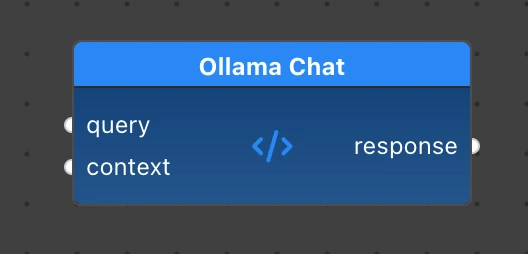
This node receives the unmodified query and the context string from the Retriever. It then creates a prompt and sends it to a LLaMA chat to get a response.
import ollama


class OllamaChat(Component):
    """Chat with the Ollama model."""

    inputs = {
        "query": Input(description="Query text", type=str),
        "context": Input(description="Context text", type=str),
    }

    outputs = {"response": Output(description="Response from the Ollama model", type=str)}

    def process(self, query: str, context: str) -> dict[str, str]:
        logger.info(f"Loaded context:\n\n {context}\n\n")

        # System prompt tells the agent about their role and sets ground rules
        system_prompt = """You are a helpful assistant that answers questions based on provided context. Follow these guidelines:

1. PRIORITIZE the provided context over your general knowledge
2. If the context contains relevant information, base your answer primarily on it
3. If the context doesn't contain enough information to answer the question, use your general knowledge
4. Give comprehensive and detailed answer to the original question
5. If you refer to a source text, article, or author, mention the name of the source or omit it if you don't know
6. Combine information from multiple sources when neccessary"""

        # Our user prompt with structured format
        prompt = f"""Context:
{context}

Question: {query}

Please answer the question based primarily on the provided context"""

        # Invoke the model
        response = ollama.chat(
            model="llama3.2",  # Replace this with other model string if needed, e.g. "phi4"
            messages=[{"role": "system", "content": system_prompt}, {"role": "user", "content": prompt}],
        )
        return {"response": response["message"]["content"]}
As you can see, we have used some prompt optimization techniques to achieve better results for our RAG:
- Provided clear instructions on RAG context vs. general knowledge in the system prompt
- Instructed the agent on how to frame the response
- Combined the context with the user query in the user prompt
The resulting prompt will make our RAG system more reliable and help LLaMA 3.2 provide more accurate, context-grounded responses while being transparent about the limitations of the provided context.
Using other Chat APIs, e.g., OpenAI
Replacing a local LLM with one running in the cloud is easy. For example, let’s add OpenAIChat instead of OllamaChat to our RAG.
First, install the dependencies and add your OpenAI API key to the environment variables:
pip install langchain-openai
export OPENAI_API_KEY="your-api-key"
Next, implement the OpenAIChat component with the same inputs and outputs schema as OllamaChat we implemented before:
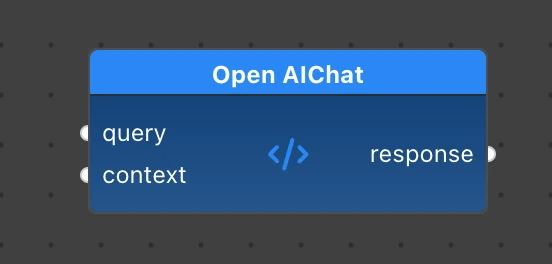
from langchain_openai import ChatOpenAI # Add this to imports


class OpenAIChat(Component):
    """Chat with the OpenAI model."""

    inputs = {
        "query": Input(description="Query text", type=str),
        "context": Input(description="Context text", type=str),
    }

    outputs = {"response": Output(description="Response from the OpenAI model", type=str)}

    def _init(self):
        if not hasattr(self, "_llm"):
            self._llm = ChatOpenAI(model="gpt-4o")

    def process(self, query: str, context: str) -> dict[str, str]:
        logger.info(f"Loaded context:\n\n {context}\n\n")

        # Load the model if needed
        self._init()

        # Construct the prompts
        system_prompt = """You are a helpful assistant that answers questions based on provided context. Follow these guidelines:

1. PRIORITIZE the provided context over your general knowledge
2. If the context contains relevant information, base your answer primarily on it
3. If the context doesn't contain enough information to answer the question, use your general knowledge
4. Give comprehensive and detailed answer to the original question
5. If you refer to a source text, article, or author, mention the name of the source or omit it if you don't know
6. Combine information from multiple sources when neccessary"""

        prompt = f"""Context:
{context}

Question: {query}

Please answer the question based primarily on the provided context"""

        # Invoke the model
        response = self._llm.invoke([("system", system_prompt), ("human", prompt)])

        return {"response": response.content}  # type: ignore
Looks very similar to how we work with Ollama, but the prompt and response structure is a bit different. We also used the _init() method to avoid reinitializing the model on every input.
Note: If you get
openai.RateLimitError: Error code: 429when using this component, it most likely means your OpenAI credit balance is zero.
The resulting flow will also be almost the same as the Ollama flow above, just replacing the Chat node:
Putting it all together
Now that we have our components implemented in rag.py, it’s time to update the flyde-nodes.json and create a new visual flow in Flyde:
pyflyde gen .
Then invoke the Flyde: New Visual Flow command in VSCode and create the Rag.flyde flow as shown in the diagram above.
This time, we cannot just run pyflyde Rag.flyde to talk to the chatbot. Our flow is designed to be embedded in a UI app. We are going to implement it next.
Adding a Streamlit UI
In case you are not familiar with Streamlit, it is a simple web-based UI library. It differs from similar toolkits in that it does not have traditional views, templates, or reactive handlers. Instead, it provides a set of UI components that you can use in your Python script. The essential feature of Streamlit is that it re-runs your script each time an interaction happens or the view needs re-rendering.
This might sound complicated and unusual, but in practice, it can be simpler than conventional UI toolkits. Let’s have a look at our Streamlit app.py:
"""Streamlit app for the UI to query the RAG with chat interface"""

import logging
import sys
import time
from dataclasses import dataclass
from queue import Empty, Queue

import streamlit as st
import torch
from flyde.flow import Flow
from flyde.io import EOF

# =============================================================================
# CONFIGURATION & SETUP
# =============================================================================

# Configure logging to show in console (avoid duplicates)
if not logging.getLogger().handlers:
    logging.basicConfig(
        level=logging.INFO,
        format="%(asctime)s - %(name)s - %(levelname)s - %(message)s",
        stream=sys.stdout,
    )
else:
    # If already configured, just set the level
    logging.getLogger().setLevel(logging.INFO)

# Fix streamlit torch classes path warning
torch.classes.__path__ = []  # type: ignore

# Page config
st.set_page_config(page_title="SWLWI Knowledge Base", page_icon="🚀", layout="wide")

# =============================================================================
# CORE APPLICATION LOGIC
# =============================================================================


@dataclass
class FlowWrapper:
    flow: Flow
    query: Queue
    response: Queue


@st.cache_resource
def wrap_flow() -> FlowWrapper:
    """Load and initialize the RAG flow with error handling."""
    try:
        with st.spinner("🚀 Loading knowledge base..."):
            flow = Flow.from_file("Rag.flyde")
            query_q = flow.node.inputs["query"].queue
            response_q: Queue = Queue()
            flow.node.outputs["response"].connect(response_q)
            flow.run()
            return FlowWrapper(flow, query_q, response_q)
    except Exception as e:
        st.error(f"❌ Failed to load knowledge base: {str(e)}")
        st.stop()


def get_response_with_timeout(response_queue: Queue, timeout: int = 120) -> str:
    """Get response from queue with timeout handling."""
    logging.info(f"Waiting for response with {timeout}s timeout...")
    try:
        response = response_queue.get(timeout=timeout)
        logging.info("Response received successfully")
        return response
    except Empty:
        logging.warning(f"Request timed out after {timeout} seconds")
        return "⚠️ Request timed out. Please try again with a shorter question or check if the model is running."


def show_typing_indicator(placeholder):
    """Show animated typing indicator."""
    for i in range(3):
        placeholder.markdown("🤔 Assistant is thinking" + "." * (i + 1))
        time.sleep(0.3)


def handle_exit_command():
    """Handle graceful exit when user types /bye."""
    with st.chat_message("assistant", avatar="🤖"):
        st.markdown("👋 **Goodbye! Thanks for using SWLWI Knowledge Base!**")
    try:
        st.session_state.flow_wrapper.query.put(EOF)
    except Exception:
        pass
    st.balloons()
    time.sleep(2)
    st.stop()


def process_user_query(prompt: str, flow_wrapper: FlowWrapper) -> str:
    """Process user query and return response."""
    logging.info(f"Sending query: {prompt[:50]}...")
    flow_wrapper.query.put(prompt)
    response = get_response_with_timeout(flow_wrapper.response)

    if response == EOF:
        st.markdown("👋 **Goodbye! Thanks for using SWLWI Knowledge Base!**")
        st.balloons()
        st.stop()

    return response


def initialize_session_state():
    """Initialize session state variables."""
    if "messages" not in st.session_state:
        st.session_state.messages = []
    if "flow_wrapper" not in st.session_state:
        st.session_state.flow_wrapper = wrap_flow()


def display_welcome_message():
    """Display welcome message for new users."""
    if not st.session_state.messages:
        with st.chat_message("assistant", avatar="🤖"):
            st.markdown("""
            👋 **Welcome to the Software Leads Weekly Index Knowledge Base!**

            I'm here to help you with questions about:
            - 🎯 Software leadership and management
            - 🔧 Technical best practices
            - 👥 Team building and culture
            - 📈 Industry insights and trends

            **Try asking me anything about software leadership!**
            """)


def display_chat_history():
    """Display all messages in chat history."""
    for message in st.session_state.messages:
        avatar = "👤" if message["role"] == "user" else "🤖"
        with st.chat_message(message["role"], avatar=avatar):
            st.markdown(message["content"])


def process_chat_input():
    """Handle new chat input from user."""
    if prompt := st.chat_input("Ask me anything about software leadership... (type '/bye' to exit)", key="chat_input"):
        # Handle exit command
        if prompt.strip().lower() in ["/bye", "bye", "exit", "quit"]:
            handle_exit_command()

        # Add user message
        st.session_state.messages.append({"role": "user", "content": prompt})

        # Display user message
        with st.chat_message("user", avatar="👤"):
            st.markdown(prompt)

        # Get and display response
        with st.chat_message("assistant", avatar="🤖"):
            # Show typing indicator
            typing_placeholder = st.empty()
            show_typing_indicator(typing_placeholder)
            typing_placeholder.empty()

            # Process response
            with st.spinner("Processing your question... (This may take up to 2 minutes for the first question)"):
                try:
                    response = process_user_query(prompt, st.session_state.flow_wrapper)
                    st.markdown(response)
                except Exception as e:
                    response = f"❌ Sorry, I encountered an error: {str(e)}"
                    st.markdown(response)

        # Add assistant response to history
        st.session_state.messages.append({"role": "assistant", "content": response})


# =============================================================================
# VISUAL STYLING & DECORATIONS
# =============================================================================


def apply_custom_styles():
    """Apply custom CSS styling to the app."""
    st.markdown(
        """
    <style>
    .main-header {
        text-align: center;
        padding: 1rem 0 2rem 0;
        background: linear-gradient(90deg, #667eea 0%, #764ba2 100%);
        color: white;
        border-radius: 10px;
        margin-bottom: 2rem;
    }
    .stChatMessage {
        padding: 1rem;
        border-radius: 10px;
        margin: 0.5rem 0;
    }
    .example-btn {
        margin: 0.2rem 0;
    }
    </style>
    """,
        unsafe_allow_html=True,
    )


def display_header():
    """Display the main header with styling."""
    st.markdown(
        """
    <div class="main-header">
        <h1>🚀 Software Leads Weekly Index KB</h1>
        <p style="font-size: 1.2em; margin: 0;">Your AI assistant for software leadership insights</p>
    </div>
    """,
        unsafe_allow_html=True,
    )


def display_footer():
    """Display footer with helpful tips."""
    st.markdown("---")
    st.markdown(
        "<div style='text-align: center; color: #666; padding: 1rem;'>"
        "💡 <strong>Tip:</strong> Try asking specific questions about software leadership, "
        "team management, or technical best practices for the best results!"
        "</div>",
        unsafe_allow_html=True,
    )


# =============================================================================
# MAIN APPLICATION FLOW
# =============================================================================


def main():
    """Main application entry point."""
    # Apply visual styling
    apply_custom_styles()
    display_header()

    # Initialize core app state
    initialize_session_state()

    # Display chat interface
    display_welcome_message()
    display_chat_history()

    # Handle user input
    process_chat_input()

    # Display footer
    display_footer()


# Run the app
if __name__ == "__main__":
    main()
else:
    # When imported or run by streamlit
    main()
The main() function serves as our Streamlit application’s entry point and orchestrates the entire chat interface:
- Visual Setup: First, it applies custom CSS styling and displays the header section
- State Initialization: It initializes Streamlit’s session state, including the message history and the flow wrapper (which contains our PyFlyde RAG flow)
- UI Components: It displays the welcome message and chat history from previous interactions
- Input Processing: It handles new user input through the
process_chat_input()function - Footer Display: Finally, it shows the footer section
The FlowWrapper data class holds our application state - it contains the PyFlyde Flow and two queues for communication. The wrap_flow() function uses Streamlit’s st.cache_resource decorator, ensuring the RAG flow is loaded only once and reused across sessions.
The chat input handling supports special commands like /bye to gracefully exit the application. For regular queries, it triggers the RAG pipeline to retrieve relevant documents, augment the context, and generate responses using the LLM.
Note that Streamlit automatically re-runs the entire script on each user interaction, which is why we use session state to maintain conversation history and cached resources to avoid reloading the flow.
To run the application, invoke:
streamlit run app.py
Here is how the UI of our application looks in action in a browser window:
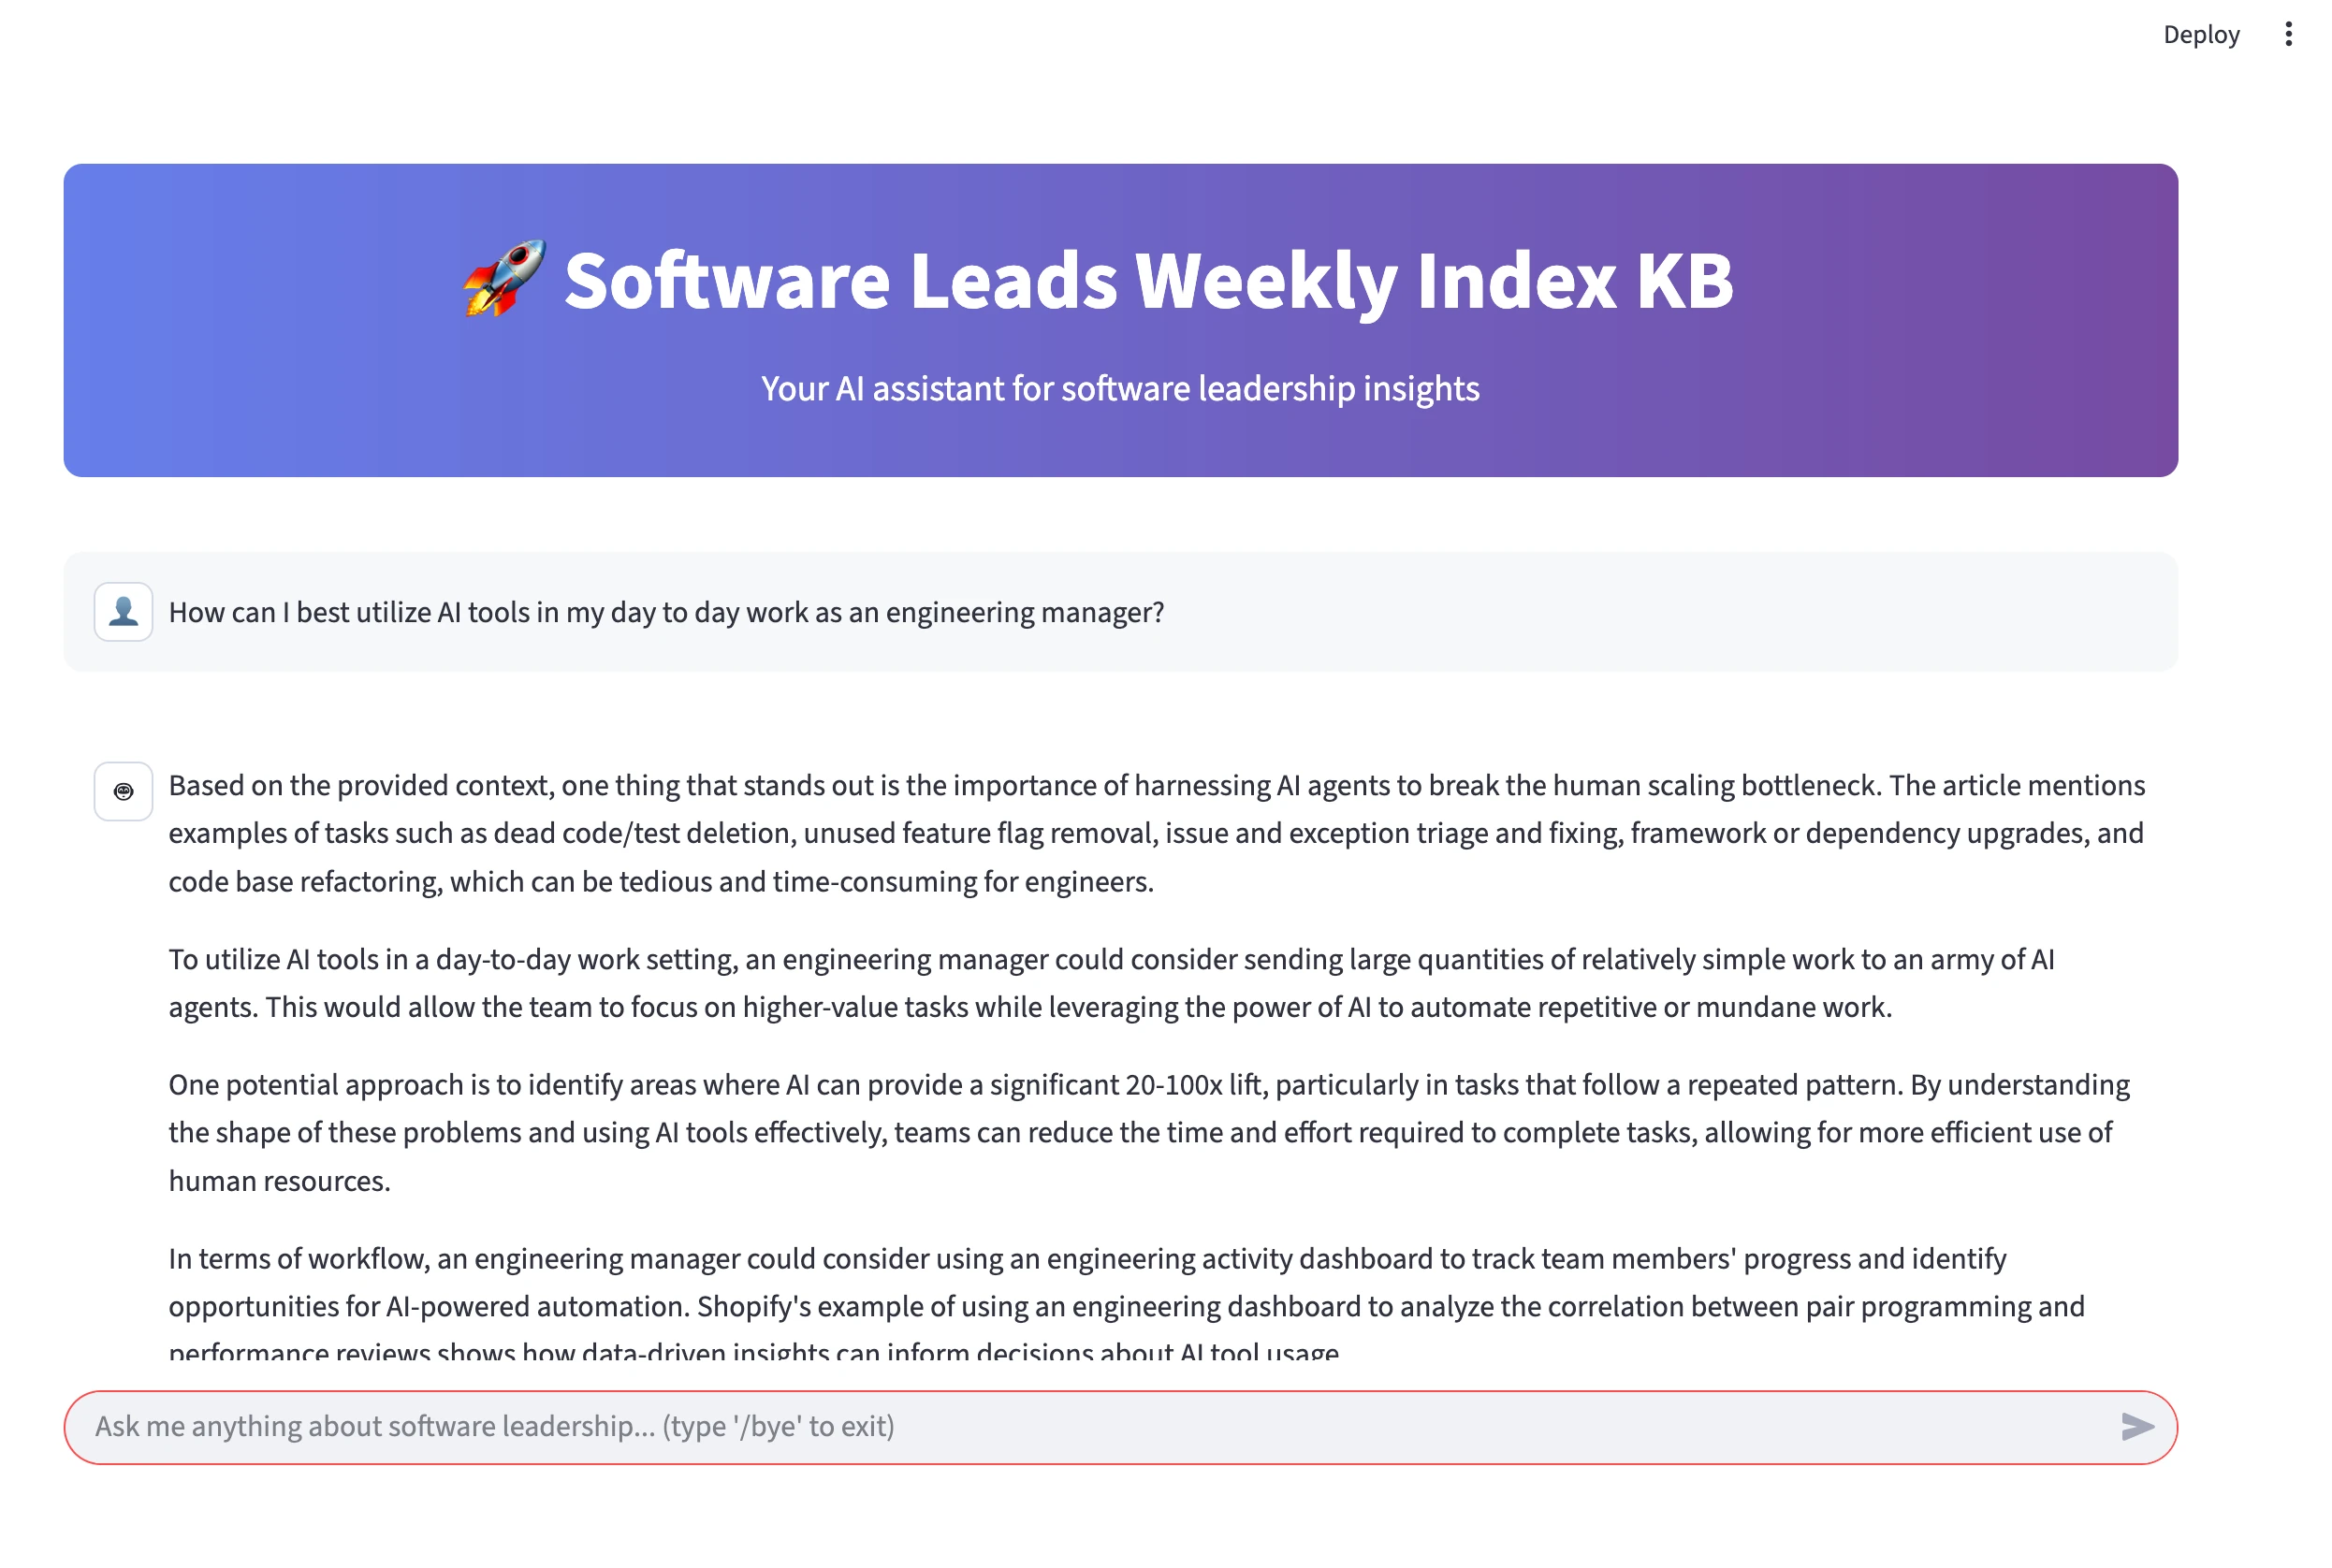
When finished chatting, type /bye to shut down our PyFlyde flow gracefully, and hit Ctrl + C to close the Streamlit app in the terminal.
Conclusion
In this tutorial, we have gone through an exciting journey to create an interactive knowledge base with an LLM-powered chat interface. From scraping thematic blog posts to building a search index, integrating Retrieval Augmented Generation, and wrapping it all up in a user-friendly UI, we’ve covered a wide range of practical applications.
Key takeaways
Here’s a recap of the valuable lessons we’ve learned:
-
Data flow perspective:
- Identifying critical data inputs, outputs, and transformation steps.
- Designing key nodes that effectively process and transform data.
-
Reusable components with PyFlyde:
- Defining clear interfaces with inputs and outputs.
- Implementing the logic in Python.
- Handling various input types and sending output effectively.
-
Visual data flows in VSCode with Flyde:
- Leveraging Flyde’s visual language and component library.
- Creating and refining visual flows seamlessly within VSCode.
-
AI Engineering libraries and tools:
- Utilizing LangChain for data processing and integration.
- Working with LLMs locally using Ollama and remotely with OpenAI.
- Implementing Vector Store for semantic search.
- Enhancing LLM prompts with Retrieval Augmented Generation.
-
Iterative development of Flow-based applications:
- Starting with simple flows and achieving end-to-end functionality.
- Gradually adding complexity and covering more use cases.
- Embedding data flows into conventional Python applications.
Reflecting on Flow-Based Programming and Flyde
Flow-based programming offers a unique approach to Data and AI Engineering. It aligns perfectly with the flow-based nature of data pipelines, providing a powerful tool for designing, structuring, and visualizing applications. This approach simplifies onboarding, enhances collaboration, and makes the development process more enjoyable.
However, it’s important to acknowledge that tools like Flyde and PyFlyde are still in their early stages. While they are excellent for learning, prototyping, and small to medium-sized projects, they may not yet be suitable for large-scale or corporate environments due to potential bugs and stability issues. As the time goes by and more people battle test them, eventually these tools may become the mainstream, given how naturally they fit into the agentic development workflow.
Embracing AI Coding Assistants
One of the standout benefits of this paradigm is its compatibility with AI coding assistants. By defining clear data flows and interfaces, AI assistants like Copilot and Claude can efficiently generate implementation code, making the development process smoother and more efficient. In fact, this is how this project built: I took more of an architect’s seat defining the flows and the interfaces of the black boxes, and the AI agents wrote most of the implementation code.
What makes Flyde special?
This is a question I kept coming back to while working on this tutorial: what actually makes Flyde special? Over the past 15 years, I’ve explored, used, and even contributed to a variety of visual and dataflow programming tools. Yet, none of them truly became part of my regular workflow. The main reason? They always felt disconnected from the everyday tools that most developers rely on.
No-code, low-code, lego-code: these buzzwords were exciting for a while. But once the initial hype faded, it became clear that apps built with those platforms were best suited for personal projects. Scaling them up or maintaining them as part of a larger team often meant introducing others to something unfamiliar and, frankly “exotic”.
Flyde takes a different approach. It’s designed to fit right into the toolchain you already use. If you’re comfortable with a modern IDE, you can start building real, meaningful applications with Flyde right away. Even better, Flyde’s visual clarity doesn’t come at the expense of flexibility: you can combine it with the vast ecosystem of libraries, frameworks, plugins, and extensions that you and your team already know and love. This synergy is what sets Flyde apart and makes it a genuinely practical tool for modern development.
Next Steps
Now that you have Flyde and PyFlyde in your toolkit, your own journey begins. Whether you’re building innovative prototypes, exploring new AI applications, or enhancing existing workflows, these tools help you to bring your ideas to life.
If you’re eager to dive deeper and explore more tools, here are some useful links:
- Flyde
- PyFlyde
- Flow-Based Programming Wiki
- KNIME - enterprise-level visual data engineering workflows
- Langflow - LLM-focused visual IDE
Thank you for joining me on this journey. I hope this tutorial has inspired you to embrace the power of visual AI engineering and Flow-based Programming. Now, go ahead and create something amazing!