Contents
Introduction
Building data pipelines often involves integrating multiple tools and services into complex workflows. While traditional programming approaches are effective, visual tools can offer a more intuitive and streamlined way to design and manage these workflows.
In this tutorial, we will explore how to use Flyde, a visual programming tool, to construct a web scraper that feeds into a Retrieval Augmentation Generation (RAG) system. This tutorial aims to go beyond basic examples to demonstrate a more complex application, providing insights into the advantages and trade-offs of visual programming.
Our tutorial is divided into two parts. In Part 1 (this article), we will focus on scraping and cleaning the data using Flyde and Python. It will get us nice and comfortable with visual programming, while using our familiar Python coding skills. In Part 2, we will extend the project by transforming the scraped content into a RAG system, utilizing LangChain, a vector database, LLaMA3 or OpenAI API, and Flyde to integrate the components.
By the end of this tutorial, you will have a comprehensive understanding of how to leverage visual programming tools to build and manage modern data and AI pipelines.
Flow-based Programming and Flyde
Before diving into implementation or specifics of the application we are going to be building, let’s understand the key concepts we’ll be using.
What is Flow-based Programming?
Flow-based Programming (FBP) is a programming paradigm that defines applications as networks of “black box” processes exchanging data across predefined connections. Think of it as building with Lego blocks - each block has a specific function, and you connect them to create something larger.
Learn more about Flow-based Programming from What is Flow-based Programming section in my blog.
Key concepts in Flyde
Flyde is a modern implementation of FBP that provides a Visual Studio Code extension to edit the diagrams in your project. It is built in TypeScript and for TypeScript by default. We will use Flyde’s VSCode extension in combination with the PyFlyde Python runtime to write and run our Flyde code with Python.
Here are the core concepts of Flyde that we will use in this article:
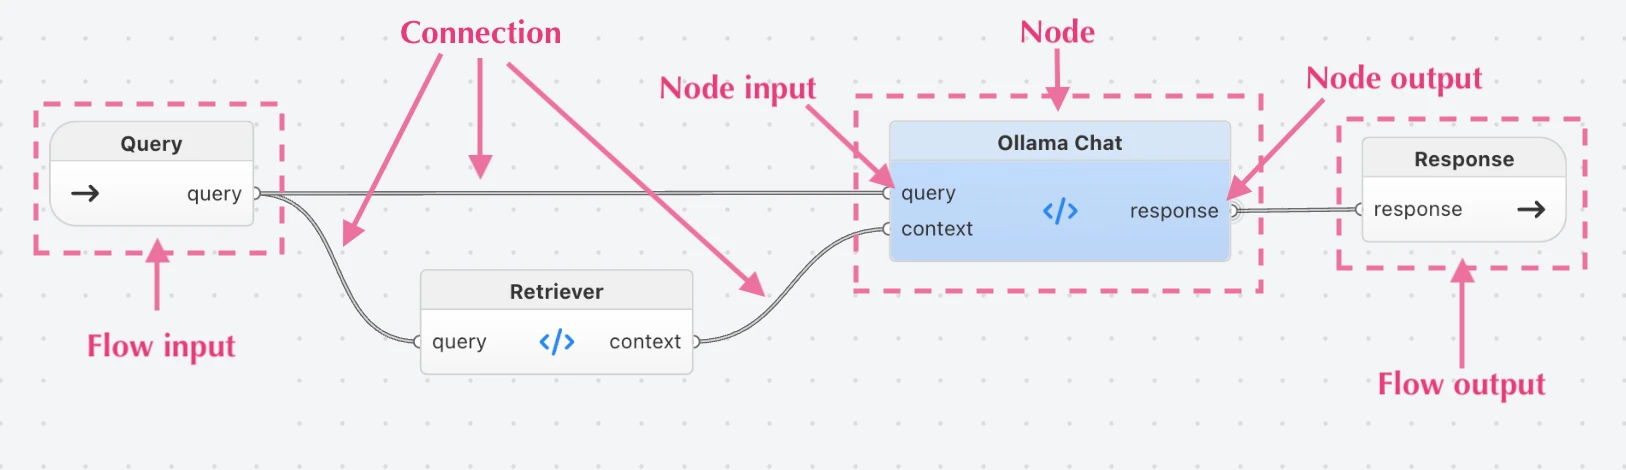
- Node is the main building block. Everything consists of nodes that process data and pass it along. There are two types of Nodes:
- Code Node (aka Component in PyFlyde and FBP) - nodes that are defined in a textual programming language like Python, TypeScript, etc.
- Visual Node (aka Graph in PyFlyde and FBP) - nodes that consist of other nodes and connections, defined as Flyde flows. Visual Nodes can contain other Visual Nodes, and so on, allowing you to use as many layers of nesting and reuse your flows as needed.
- Inputs and outputs are ports that connect the nodes with the world around them.
- Connection connects outputs to inputs and wires the Nodes together. Typically, it acts like a queue, delivering messages one by one.
- Flow is a visual representation of an application or its part. A Flow consists of Nodes wired together with Connections. A Flow can have its own Inputs and Outputs as well, so that it can be used from the outside.
Comparison of Flyde to n8n and Langflow
There are many visual programming frameworks out there, but for our use case, the most relevant are n8n and Langflow.
n8n is a workflow automation tool with a node-based visual interface. Like Flyde, it’s written in TypeScript and runs on Node.js. n8n’s real strength is its vast library of integrations: hundreds of connectors for third-party services and APIs, making it a powerful low-code orchestrator. You can also run Python code inside n8n nodes via a wrapper, though it’s not the primary language.
In recent months, n8n has put a lot of focus on AI, positioning itself as an “AI Automation Workflow” platform. In practice, this means you’ll find a growing set of AI-specific nodes available out of the box. For a taste, check out their AI Chat Agent tutorial.
Langflow is a visual IDE focused on LLM-centric flows. It’s built in Python and started as a visual wrapper for the popular LangChain library, but has grown into a low-code platform for LLM and NLP use cases.
Here’s a quick comparison of n8n, Langflow, and Flyde as of mid-2025:
| Aspect | n8n | LangFlow | Flyde |
|---|---|---|---|
| Purpose | Workflow automation | LLM workflows | Application development |
| Visual UI | Browser-based | Browser-based | VSCode extension (+Cursor, Windsurf, etc.) |
| Programming language | TypeScript (+Python wrapper) | Python | TypeScript (+PyFlyde) |
| License | Fair-code dual licensed | MIT | MIT & AGPLv3 (editor) |
| Integrations | 250+ of all sorts | ~50 AI-specific | 20+ of all sorts |
| Deployment | Self-hosted and managed cloud | Self-hosted and managed cloud | Self-hosted |
| AI components | ✅ | ✅ | ✅ |
Which framework to choose depends on your goals and your comfort with writing code:
- No-code/low-code automations: If you want to connect APIs and services to automate repetitive tasks, and you’re not building a full-fledged app or service, go with n8n.
- LLM/agentic pipelines: If you’re experimenting with LLMs and language processing, and want to build pipelines in a rich UI without much coding, try Langflow.
- Application development: If you’re building a new app or service, whether you’re an experienced developer or just starting out, and you’re drawn to the flexibility and structure of visual programming, give Flyde a try.
For this tutorial, we’ll be using Flyde.
The concept of our app
As an Engineering Manager, I find the Software Leads Weekly newsletter invaluable. It contains hundreds of curated articles on management topics, considering popular questions from different angles. Often, while mentoring other EMs, I come across a certian question and try to rember “What was that article about this topic?” from the newsletter. Sometimes I find it, sometimes not.
This inspired our project: we’ll build a Software Leads Weekly index (SWLWi) with an LLM interface, that will let you “talk” to the Software Leads Weekly knowledge base. The complete system will have four components:
- Scraper (part 1) - fetches the newsletter issues and retrieves the articles from third-party blogs referenced in those issues. It converts each article to Markdown and then cleans it up to reduce noise in our data. The result is a local catalog of Markdown files containing the articles from the newsletter.
- Indexer (part 2) - creates a searchable index of tokens generated from the scraped articles in a Vector Store. It splits the articles into smaller chunks, converts them to tokens that an LLM can understand, and saves them in a Vector database.
- RAG (part 2) - receives a query/prompt, searches the Vector Store for matching token sequences, and provides them as context along with the prompt to a LLaMA3.
- UI (part 2) - a simple Streamlit app that wraps our RAG and allows a user to query the database and get responses.
The resulting application is available in a SWLWi Github repository.
This might be a very niche application, so consider this as a tutorial for building similar applications for whatever domain and data source you might be interested in. Our goal here is to learn how to build applications around LLMs and text processing, and how visual tools like Flyde can help make this task more comprehensive.
Getting started
Prerequisites for this tutorial part
Here is what you will need today:
- Python 3.10 or newer
- Basic Python programming experience
- Familiarity with web concepts (HTML, HTTP requests)
- Visual Studio Code
- Basic understanding of web scraping (helpful but not required)
Some useful links to the tools and libraries we are going to use:
- Flyde - visual programming tool and VSCode extension.
- PyFlyde - Python library and runtime for Flyde.
- BeautifulSoup4 - Python library for web scraping.
- Playwright - browser automation for end-to-end testing and more.
- Markdownify - Markdown conversion library for Python.
Creating the project structure
Let’s set up our project with a clean structure:
swlwi
├── .venv                        # Virtual environment for Python
├── swlwi
│   ├── __init__.py
│   ├── <our Python modules>
│
├── tests
│   ├── test_<module_name>.py
│
├── index
│   ├── issue-<issue number> /   # Subfolder for newsletter issue
│   │   ├── article-<number>.md  # Scraped article files
│   ├── vectors /                # Folder for the vector database files
│
├── pyproject.toml               # Python project setup and deps
├── Makefile                     # Makefile
├── <root-level Python files>
├── <Flyde flow files>
Setting up dependencies
Create a pyproject.toml with our dependencies:
[build-system]
# This part is needed to install and manage dependencies
requires = ["setuptools", "setuptools-scm"]
build-backend = "setuptools.build_meta"

[project]
# General project setup
name = "swlwi"
version = "0.0.3"
requires-python = ">= 3.10"
authors = [{ name = "Your name here" }]
description = "Software Leads Weekly Intelligent Index"

# All our dependencies are listed here
dependencies = [
    "beautifulsoup4 >= 4.0.0, < 5.0.0",   # HTML parsing
    "markdownify ~= 1.1.0",               # HTML to Markdown conversion
    "playwright >= 1.0.0, < 2.0.0",       # JavaScript-enabled scraping
    "pyflyde ~= 0.1.0",                   # Flyde runtime for Python
    "requests >= 2.0.0, < 3.0.0",         # Basic HTTP requests
]

[tool.setuptools.packages.find]
# Tells Python where to find our local package
where = ["swlwi"]
Creating the environment
Set up a Python virtual environment to isolate the dependencies for our project:
python3 -m venv .venv     # Create a virtual environment
source .venv/bin/activate # On Windows: .venv\Scripts\activate
pip install .             # Install the dependencies
Building the Scraper
Developer workflow with Flyde
When building applications with Flyde, I recommend following this workflow:
- Design the high-level flow
- Create component interfaces
- Build the visual flow
- Implement component behavior
- Test and iterate
This approach helps catch design issues early and makes the development process more structured.
Designing and implementing our first Flyde flow
Let’s start with a simple flow that handles basic web pages:

Following our developer workflow defined above, at first just define the interface parts of the nodes on the graph, and then complete the behavior implementation.
Defining data structures
First, let’s define our core data structures which our nodes will use to pass the messages along. In the swlwi package create a new module called schema.py with the following contents:
from dataclasses import dataclass
from datetime import date


@dataclass
class Issue:
    """Represents a newsletter issue"""

    num: int
    url: str
    date: date
    item_of: tuple[int, int] = (0, 0)  # (current, total)


@dataclass
class Article:
    """Represents an article within an issue"""

    title: str
    url: str
    issue_num: int = 0
    reading_time: int = 0  # minutes
    summary: str = ""
    html: bytes = b""
    markdown: str = ""
    item_of: tuple[int, int] = (0, 0)  # (current, total)
    parent_item_of: tuple[int, int] = (0, 0)  # parent issue's item_of
These data structures are all we need: Issues and Articles. Most of the fields like num, url and title are pretty self-explanatory. In the Article we will store both the raw html contents and the stripped down markdown version of it.
The item_of and parent_item_of tuples might be a bit tricky and these are totally optional. I’ve added them to give an idea of more complex stream processing that you may want to implement in your applications at some point. They act as pointers, like “issue 3 out of 100” and “article 5 out of 7”. This is useful for operations like fan-out and fan-in, so the fan-in component knows which items in a batch it has received and how many more to expect.
Defining Component interfaces
As a next step, we will create the scrape.py module which will contain the custom components of the scraper.
For now, let’s code all the nodes of the above flow as black boxes with just inputs and outputs:
from flyde.io import Input, InputMode, Output, Requiredness
from flyde.node import Component
from swlwi.schema import Article, Issue
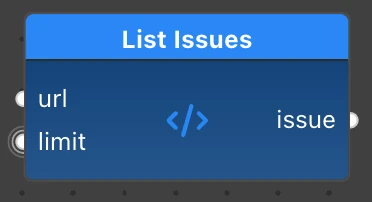
class ListIssues(Component):
"""Fetches the index by the URL, parses it and returns a stream of issues and their URLs."""
inputs = {
"url": Input(description="URL of the index page", type=str),
"limit": Input(description="Limit the number of issues to fetch",
type=int, mode=InputMode.STICKY),
}
outputs = {
"issue": Output(description="List of issues", type=Issue),
}
def process(self, url: str, limit: int):
pass
class ExtractArticles(Component):
"""Extracts articles from the issue page."""
inputs = {
"issue": Input(description="Issue", type=Issue),
}
outputs = {
"article": Output(description="Article", type=Article),
}
def process(self, issue: Issue):
pass
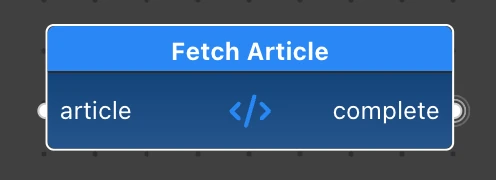
class FetchArticle(Component):
"""Fetches the article HTML from the Internet."""
inputs = {
"article": Input(description="Article", type=Article),
}
outputs = {
"complete": Output(description="Article with HTML content", type=Article),
}
def process(self, article: Article):
pass
class ExtractArticleContent(Component):
"""Extracts the article content from the HTML and converts it to Markdown."""
inputs = {
"article": Input(description="Article", type=Article),
}
outputs = {
"article": Output(description="Article with content", type=Article),
}
def process(self, article: Article):
pass
class SaveArticle(Component):
"""Saves the article to a file."""
inputs = {
"article": Input(description="Article", type=Article),
"path": Input(
description="Path prefix to save the article",
type=str,
mode=InputMode.STICKY
),
}
def process(self, article: Article, path: str):
pass
As you can see, each PyFlyde Component defines its inputs and outputs as dictionaries, mapping the names to Input or Output objects from the flyde.io module. All inputs/outputs in our examples have optional descriptions and type hints.
What does this mode=InputMode.STICKY argument do? By default, inputs in Flyde act as FIFO queues. What InputMode.STICKY does is make the input remember the last value it received from the queue and not block its execution until the next value arrives. This is useful when working with configuration parameters, as we only receive them once and keep using them with other input data. We’ll see this feature in use when we implement the full process() code.
Adding nodes to the flow
Although some of our nodes don’t do anything yet, it is becoming clearer what they are going to do and, more importantly, how they are going to be used together. Before we add them to a visual Flyde flow, we need to generate flyde-nodes.json manifest, so that the Flyde visual editor can see our new nodes:
pyflyde gen .
Then we can go to VSCode (or Cursor, or other VSCode-based IDE you’re using), press Cmd + Shift + P, and choose the Flyde: New Visual Flow command to create a new flow diagram. Let’s call it Scrape.flyde.
To add a new node to the flow, click the “+” button in the top right corner or use the Cmd + K hotkey. This will open the Flyde nodes toolbar:

You will see the Python components we defined above under “Your PyFlyde Nodes” section, and “PyFlyde Standard Nodes” contains the standard node library provided by PyFlyde. Use the search bar on the top to quickly find the Inline Value standard node.
We need to add our constant values for the URL and issues limit. Add them as two inline value nodes to the flow. Double click on the node to edit its configuration:
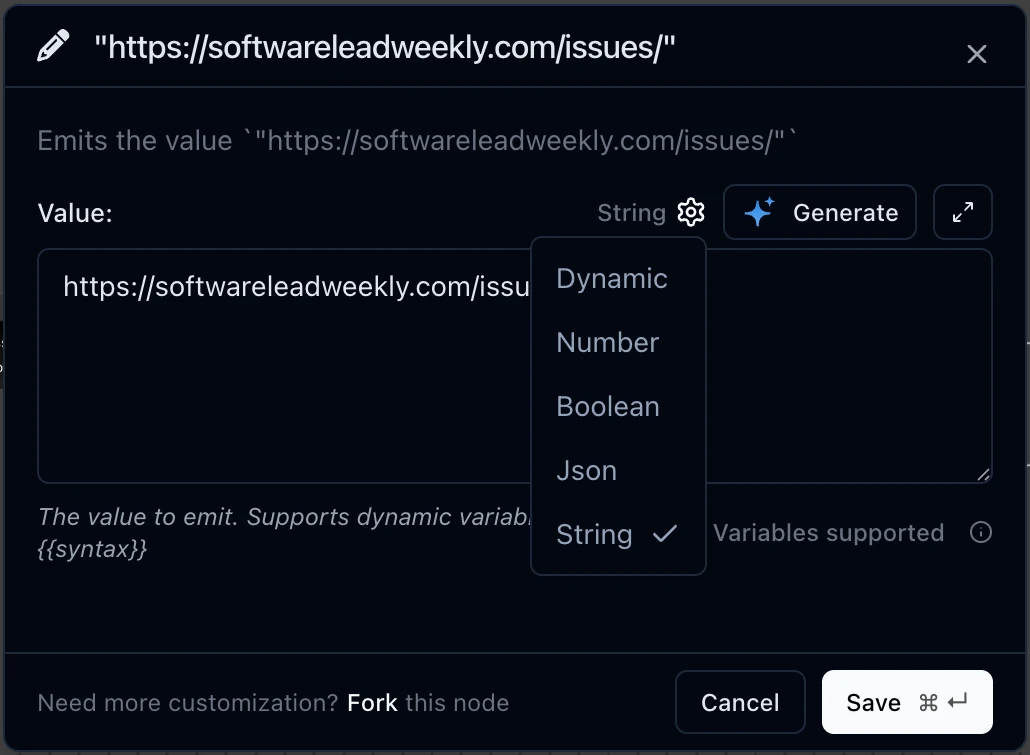
For the URL inline value, enter https://softwareleadweekly.com/issues/ as the value and hit “Save”. For the limit of the number of issues, add another Inline Value, enter 20 as the value, and choose Number as its type in the type dropdown (by default it is shown String). Now you know how to add constants to the diagram, so you can add them whenever needed like this.
Use the node toolbar to add other nodes to our flow.
To connect two nodes, press the mouse button on the output pin and drag the pointer to the input pin you want to connect it to. Or you can click on the output pin once and hover over the target input pin: Flyde editor will suggest a connection, which you can apply by clicking on the input.
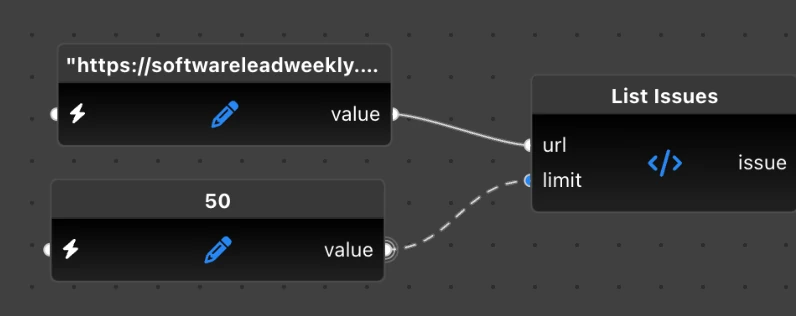
For example, connect the value output of our URL InlineValue to the url input of the ListIssues node. Then connect the issue output of the ListIssues node to the issue input of ExtractArticles.
One note about constants: you don’t need to use InlineValue to apply them to inputs. E.g., for the SaveArticle let’s define the default value on the path input itself:
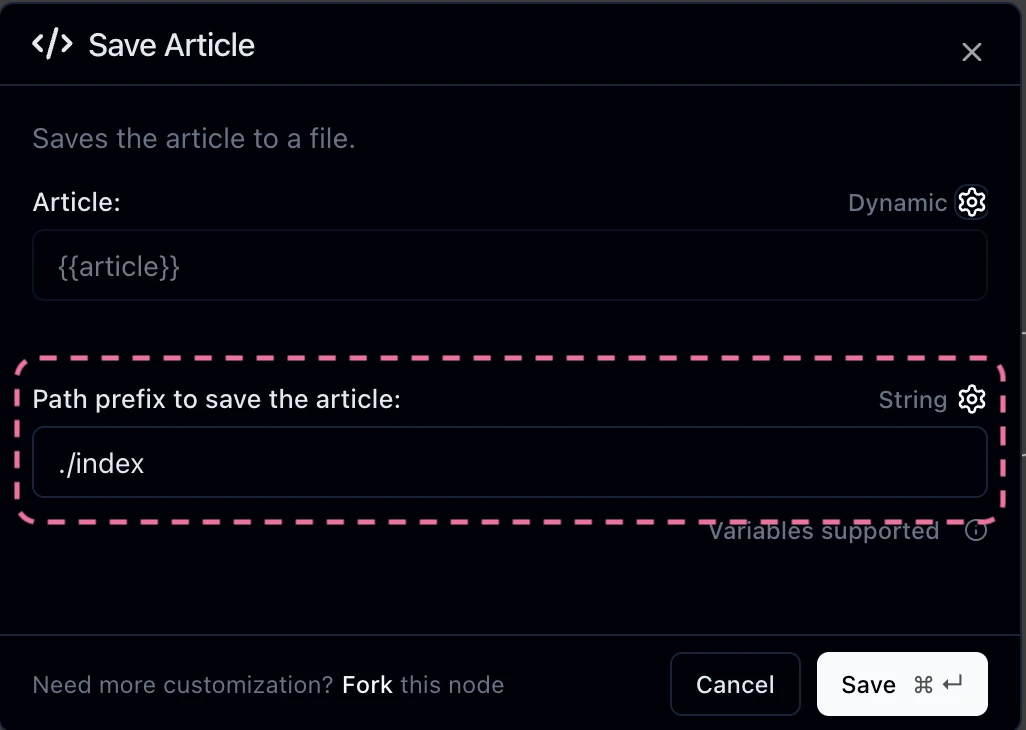
Double click on the SaveArticle node to edit its configuration. For the Path input, click on the dropdown that says Dynamic and change it to String. Then update the value to ./index and click “Save”.
This way, you can draw the whole flow and get a Scrape.flyde diagram that looks like the picture we already saw above:
Yay! We’ve created our first Flyde flow!
Our flow doesn’t do anything yet, so we need to add behavior logic next.
Implementing the node logic
The ListIssues and ExtractArticles contain a lot of HTML parsing with BeautifulSoup, which are very specific to the website that we are scraping. If you are writing a scraper for a different site, the implementation is going to be very different.
ListIssues component
Below is the main logic of the ListIssues component. The HTML parsing logic using BeautifulSoap is omitted. You can find the full source in scrape.py.
class ListIssues(Component):
    """Fetches the index by the URL, parses it and returns a stream of issues and their URLs."""

    inputs = {
        "url": Input(description="URL of the index page", type=str),
        "limit": Input(description="Limit the number of issues to fetch", type=int, mode=InputMode.STICKY),
    }

    outputs = {
        "issue": Output(description="List of issues", type=Issue),
    }

    def process(self, url: str, limit: int):
        logger.debug(f"Fetching the index page at {url}")

        # Get the page content using the requests library
        response = requests.get(url)

        # Parse the HTML content using BeautifulSoup
        soup = BeautifulSoup(response.content, "html.parser")
        issue_elements = SiteParser.find_issue_elements(soup)
        total_issues = len(issue_elements)
        item_count = 0

        # Get the base URL
        base_url = "/".join(url.split("/")[:3])

        # Process each issue
        for element in issue_elements:
            issue = SiteParser.parse_issue_element(element, base_url, item_count, total_issues)

            # Send the issue to the next component
            self.send("issue", issue)
            logger.info(f"Processing issue #{issue.num}")

            # Increment the item count and exit if the limit is reached
            item_count += 1
            if limit > 0 and item_count >= limit:
                break
The process() method is invoked when the node receives a new url value. Since limit input is sticky and it has received an InlineValue, it keeps using just the same value with different URLs.
To keep our component code clean and simple, we have moved site parsing code to a separate helper class SiteParser which you can find in the parser.py module.
After fetching and parsing the newsletter index page, we find all issue elements on it. For each issue found we send a new Issue object to the output using self.send(output_name, value) method.
ExtractArticles component

The ExtractArticles logic is going to be similar to the previous component and it is also actively using BeautifulSoup.
class ExtractArticles(Component):
    """Extracts articles from the issue page."""

    inputs = {
        "issue": Input(description="Issue", type=Issue),
    }

    outputs = {
        "article": Output(description="Article", type=Article),
    }

    def process(self, issue: Issue):
        logger.debug(f"Fetching issue #{issue.num} at {issue.url}")

        # Get the page content and parse it
        response = requests.get(issue.url)
        soup = BeautifulSoup(response.content, "html.parser")

        # Find the topic sections
        topic_sections = SiteParser.find_topic_sections(soup)
        # Count the total number of articles across all sections
        total_articles = SiteParser.count_total_articles(topic_sections)
        logger.debug(f"Found {total_articles} articles in issue #{issue.num}")

        # Loop through each topic section and extract articles
        item_count = 0
        for i, section in enumerate(topic_sections):
            next_section = topic_sections[i + 1] if i + 1 < len(topic_sections) else None
            article_divs = SiteParser.get_articles_for_section(section, next_section)

            for div in article_divs:
                article = SiteParser.extract_article(div, issue, item_count, total_articles)
                if article:
                    logger.info(
                        f"Found article '{article.title}' at {article.url} in issue #{issue.num}.\
                        Reading time: {article.reading_time} minutes."
                    )
                    logger.debug(f"Summary:\n{article.summary}")
                    self.send("article", article)
                    item_count += 1
This component is also loop-based. It fetches and parses an issue page. Then it loops over all sections in the issue to find and extract article entries, which it sends to the output as it extracts them successfully.
FetchArticle component
The FetchArticle is generic enough, so let’s write the complete code:
class FetchArticle(Component):
    """Fetches the article HTML from the Internet."""

    inputs = {
        "article": Input(description="Article", type=Article),
    }

    outputs = {
        "complete": Output(description="Article with HTML content", type=Article),
    }

    def process(self, article: Article) -> dict[str, Article]:
        try:
            response = requests.get(article.url)
            article.html = response.content

        except Exception as e:
            logger.error(f"Failed to fetch article '{article.title}' at {article.url}: {e}")
            # We still want to save at least the metadata
            return {"complete": article}

        # Return the article
        return {"complete": article}
In this component, we simply use the requests.get() function to fetch the remote page and add its HTML contents to the article object. In case of an error, it still passes the article along with an empty body.
In this case, the process() signature includes a return value of type dict:
def process(self, article: Article) -> dict[str, Article]:
    article.html = fetch_html(article.url)
    return {"complete": article}
The returned dict maps an output name to a value that needs to be sent to that output. If a node has multiple outputs, you can return all of them at once, or just a subset. This kind of signature is common for nodes that output one value per each input.
ExtractArticleContent component

The next component in our scraper module is ExtractArticleContent.
class ExtractArticleContent(Component):
    """Extracts the article content from the HTML and converts it to Markdown."""

    inputs = {
        "article": Input(description="Article", type=Article),
    }

    outputs = {
        "article": Output(description="Article with content", type=Article),
    }

    def process(self, article: Article) -> dict[str, Article]:
        if not article.html:
            logger.error(f"No HTML content found for article '{article.title}' at {article.url}")
            return {"article": article}

        markdown = html_to_markdown(article.html)

        # Clean up the Markdown content
        markdown = clean_markdown(markdown)

        # Update the article with the Markdown content
        article.markdown = markdown

        # Return the article
        return {"article": article}
The implementation of this process makes use of markdownify package and our simple cleaner functions located in parser.py module.
SaveArtile component

Let’s implement SaveArtile which saves the result to the disk, as this is quite standard Python code:
class SaveArticle(Component):
    """Saves the article to a file."""

    inputs = {
        "article": Input(description="Article", type=Article),
        "path": Input(description="Path prefix to save the article", type=str,
            mode=InputMode.STICKY),
    }

    def process(self, article: Article, path: str):
        # Save the article to a file
        dir_name = f"{path}/issue-{article.issue_num}"
        os.makedirs(dir_name, exist_ok=True)
        filename = f"{dir_name}/article-{article.item_of[0]}.md"

        logger.info(f"Saving article '{article.title}' to {filename}")

        header = f"""# {article.title}

Source: [{article.url}]({article.url})
Reading time: {article.reading_time} minutes

{article.summary}

---

"""

        try:
            with open(filename, "w", encoding="utf-8") as file:
                content = header + (article.markdown or "")
                file.write(content)
                logger.debug(f"Successfully wrote {len(content)} characters to {filename}")
        except Exception as e:
            logger.error(f"Failed to write article file {filename}: {e}")
Note that this component doesn’t have any output ports. It acts as a sink node, so it doesn’t need to output anything.
In this component we construct the directory path for the issue and create it if it doesn’t exists yet. Then we create the path string of the article itself. Note that the prefix for the directory path comes from a sticky input that is configured with inline value.
For each article we always save the header containing its title, URL, reading time, and summary. If markdown body is non-empty, it follows the header.
Running the flow
Once you have your flow wired up and ready, you can run it with PyFlyde:
pyflyde Scrape.flyde
The logging we added in the code will output something like this:
INFO:swlwi.scrape:Processing issue #633
INFO:swlwi.scrape:Processing issue #632
INFO:swlwi.scrape:Processing issue #631
INFO:swlwi.scrape:Processing issue #630
...
INFO:swlwi.scrape:Found article 'AI and Cognitive Offloading: Sharing the Thinking Process With Machines' at https://uxdesign.cc/ai-and-cognitive-offloading-sharing-the-thinking-process-with-machines-2d27e66e0f31 in issue #633. Reading time: 11 minutes.
INFO:swlwi.scrape:Found article '“Yes I Feel Fully Recharged After a Restful Holiday”' at https://x.com/mattturck/status/1876256566963568660 in issue #633. Reading time: 1 minute.
INFO:swlwi.scrape:Found article 'What Happens When AI Joins the Org Chart?' at https://every.to/working-overtime/what-happens-when-ai-joins-the-org-chart in issue #633. Reading time: 7 minutes.
INFO:swlwi.scrape:Found article 'Explore vs Execute' at https://longform.asmartbear.com/explore-execute/ in issue #633. Reading time: 9 minutes.
...
INFO:swlwi.scrape:Fetched article 'Leveraging AI for Efficient Incident Response' at https://engineering.fb.com/2024/06/24/data-infrastructure/leveraging-ai-for-efficient-incident-response/
INFO:swlwi.scrape:Extracted article content from 'Leveraging AI for Efficient Incident Response' at https://engineering.fb.com/2024/06/24/data-infrastructure/leveraging-ai-for-efficient-incident-response/
INFO:swlwi.scrape:Saving article 'Leveraging AI for Efficient Incident Response' to ./index/issue-614/article-4.md
ERROR:swlwi.scrape:No HTML content found for article 'Action Is a Skill. How to Become High-Action' at https://x.com/ShaanVP/status/1827777391294308640
INFO:swlwi.scrape:Saving article 'Action Is a Skill. How to Become High-Action' to ./index/issue-614/article-6.md
Apart from some errors from Twitter and YouTube, there is another problem. If we skim through the Markdown files, we will notice that some of the contents look like:
Enable JavaScript and cookies to view this page
Oops, we forgot that some Single Page Applications (SPA) are not so easy to access these days. No worries, there are tools that make it easy.
Iteration: improving the solution
Adding JavaScript support, SPA, and bot protection workaround
To address the problem of fetching pages that require JavaScript to render, we are going to make the following modifications to our scraper:

- Modify
FetchArticleto check if the response HTML contains errors related to JavaScript or cookies. Create an alternative output path if the article requires JavaScript to fetch. We keep trying to fetch a page with justrequestsbefore switching to Playwright to keep our scraper fast by default. - Create a new node called
FetchArticleWithJavascriptwhich fetches the article HTML using Playwright. We are only going to use it for pages that failed plain request retrieval because Playwright uses headless Chromium under the hood and works much slower. - Create a new branch in the flow that uses
FetchArticleWithJavascriptbefore parsing the page.
Installing Playwright
Playwright is a tool that allows you to automate browsers. It is primarily used to test frontend code, but it is also a great tool for scraping pages that require JavaScript to render.
Let’s install the Playwright package in our environment and download the browser binaries for Playwright:
pip install playwright
playwright install
Checking for JavaScript errors in the page HTML
We’ll send the Article object to a second output called needs_javascript instead of complete if a JavaScript problem is detected. A simple regex check in the HTML body should do the trick.
Here is the complete updated code for FetchArticle that includes a plenty of additional checks using our supplementary code from the net.py module:
class FetchArticle(Component):
    """Fetches the article HTML from the Internet."""

    inputs = {
        "article": Input(description="Article", type=Article),
    }

    outputs = {
        "complete": Output(description="Article with HTML content", type=Article),
        "needs_javascript": Output(description="Article that needs JavaScript to fetch", type=Article),
    }

    def __init__(self, **kwargs):
        super().__init__(**kwargs)
        self.http_client = HTTPClient()

    def process(self, article: Article) -> dict[str, Article]:
        domain = extract_domain_from_url(article.url)

        if should_skip_domain(domain):
            return {"complete": article}

        # Try HTTP first regardless of domain - let content analysis decide
        try:
            response = self.http_client.get(article.url, timeout=10)

            # Check for various protection/JS requirements
            if self.http_client.is_cloudflare_protected(response):
                logger.warning(f"CloudFlare protection detected for '{article.title}' at {article.url}")
                return {"needs_javascript": article}

            if self.http_client.needs_javascript(response):
                logger.debug(f"Article '{article.title}' at {article.url} needs JavaScript based on content ")
                return {"needs_javascript": article}

            # Additional content quality check
            decoded_content = self.http_client.decode_response_content(response)
            if not has_meaningful_content(decoded_content):
                logger.debug(f"Article '{article.title}' at {article.url} has poor content quality")
                return {"needs_javascript": article}

            # Domain-based fallback check (only after content analysis)
            if needs_javascript_domain(domain):
                logger.debug(f"Article '{article.title}' at {article.url} is on JS-heavy domain {domain}")
                return {"needs_javascript": article}

            article.html = decoded_content

        except Exception as e:
            logger.error(f"Failed to fetch article '{article.title}' at {article.url}: {e}")
            return {"needs_javascript": article}

        logger.info(f"Fetched article '{article.title}' at {article.url} via HTTP")
        return {"complete": article}
Fetching the page contents with Playwright
Next, we create a separate component that fetches an article using Playwright.
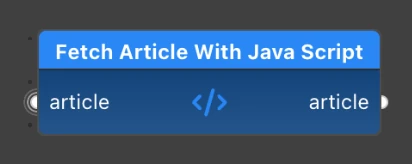
The implementation is similar to the original FetchArticle, but we use the sync_playwright API to launch a Chromium instance, navigate to the article URL, and retrieve the page contents.
class FetchArticleWithJavaScript(Component):
    """Fetches the article SPA contents using Playwright with CloudFlare bypass support."""

    inputs = {
        "article": Input(description="Article", type=Article),
    }

    outputs = {
        "article": Output(description="Article with content", type=Article),
    }

    def __init__(self, **kwargs):
        super().__init__(**kwargs)
        try:
            self.browser_client = BrowserClient()
            logger.info("Browser client initialized successfully for JavaScript fetching")
        except Exception as e:
            logger.error(f"Failed to initialize browser client: {e}")
            self.browser_client = None

    def process(self, article: Article) -> dict[str, Article]:
        logger.info(f"Starting browser fetch for '{article.title}' at {article.url}")

        # Check if browser client is available
        if not self.browser_client:
            logger.error(f"Browser client not available for '{article.title}'")
            article.html = b""
            return {"article": article}

        try:
            # Add timeout to prevent hanging - use shorter timeout for faster failure
            html_content = self.browser_client.fetch(article.url, timeout=10000)  # 10 seconds

            if html_content:
                article.html = html_content
                logger.info(
                    f"Successfully fetched article '{article.title}' at {article.url} with Playwright ({len(html_content)} bytes)"
                )
            else:
                logger.warning(f"Browser returned no content for '{article.title}'L")
                # Continue processing even if no content - don't block the pipeline
                article.html = b""

        except Exception as e:
            logger.error(f"Failed to fetch article '{article.title}' at {article.url}: {e}")
            logger.debug(f"Exception type: {type(e).__name__}")
            # Set empty HTML to ensure pipeline continues
            article.html = b""

        logger.info(f"Completed browser fetch for '{article.title}'")
        return {"article": article}
We need to update flyde-nodes.json after adding new nodes:
pyflyde gen .
Updating the flow
Updating the visual flow is as simple as connecting the new needs_javascript output of FetchArticle to the newly added FetchArticleWithJavascript node, which then outputs to the same ExtractArticleContents node. Refer to the screenshot above for guidance.
Now we can run our flow again:
pyflyde Scrape.flyde
Improving speed and robustness of the scraper
We could stop with our scraper as it is probably good enough at this point. However, with resources like Medium, we are hitting a rate limit if we run the flow as is. So, we might want to add a rate limiter to our script to avoid that. Another simple improvement we can make is to skip issues that have already been fetched. That’s what we will do next.
Skipping issues that have already been fetched
The new node we are adding here is called SkipExistingIssues, and in the graph, it looks like this:
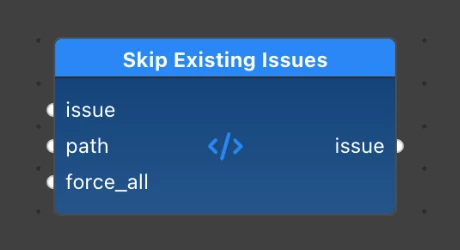
This node checks if the issue already exists in the directory under a given path. If it does, the processing of the issue stops at this stage.
class SkipExistingIssues(Component):
    """Checks if an issue already exists in the index and skips it if it does."""

    inputs = {
        "issue": Input(description="Issue", type=Issue),
        "path": Input(description="Path to the index", type=str, mode=InputMode.STICKY),
        "force_all": Input(
            description="Force processing all issues",
            type=bool,
            mode=InputMode.STICKY,
            value=False,
            required=Requiredness.REQUIRED_IF_CONNECTED,
        ),
    }

    outputs = {
        "issue": Output(description="Issue", type=Issue),
    }

    def process(self, issue: Issue, path: str, force_all: bool = False):
        if force_all:
            # Ignore the cache and force re-fetching the issue
            self.send("issue", issue)
            return

        # Check if the issue exists
        issue_path = os.path.join(path, f"issue-{issue.num}")
        if not os.path.exists(issue_path):
            # No cache found, proceeding
            self.send("issue", issue)
        else:
            # The issue already exists, skipping
            pass
What is interesting about this component is that we used the combination of mode=InputMode.STICKY, value=False, and required=Requiredness.REQUIRED_IF_CONNECTED to make the force_all input completely optional, defaulting to a False value. If connected to some output, it will use the values from that output. We will leave it with the default in our flow.
After adding new components we need to update the Flyde TypeScript stubs:
pyflyde gen swlwi/scrape.py
Then we can update Scrape.flyde in VSCode. Here is the scraper flow after adding this new node to it:

Adding a rate limiter
If we run our flow as it is, we would be hitting the websites at the quickest rate possible, and some of them wouldn’t be happy about that, especially ones like Medium and Substack, which we have quite a few links to. To address this problem, we can implement a simple rate limiter and use it in our fetcher nodes. In the final code version, RateLimiter is part of the net.py module and it is used by HTTPClient and BrowserClient under the hood, so we don’t need to modify anything in our Flyde nodes.
Wrapping up the Scraper flow and Next steps
In this tutorial, we successfully developed a scraper for Software Leads Weekly, a curated newsletter focused on managing Software Engineering teams. Using PyFlyde, we created an efficient scraping workflow and gained valuable experience with the Flyde visual editor, key concepts, and the process of building and running nodes and flows in Python.
However, this is just the beginning. There are several ways to enhance and customize your scraper flow:
- Use your data source: replace the
ListIssuesandExtractArticlescomponents to target your specific sites or sources, making the scraper useful for various applications. - Robustness and conciseness: add a retry mechanism and more scraping techniques to
FetchArticleandFetchArticleWithJavaScript. You could also use a single node that employs Playwright from the start if the volume of pages to scrape is not high and scraping speed is not a concern. - Cleaner dataset: enhance
parser.pyto clean up the scraped documents even better by preserving meaningful content and removing all remaining navigation elements, media links, decorative leftovers, etc. We didn’t focus on this part in the article because it is not central to the data flow, but there is actually a lot of room for improvement there.
In the second part of the tutorial, we will focus less on Flyde specifics and dive deeper on the AI engineering side. Here is what we will focus on:
- Creating a search index: we will build a search index for our database and store it in a Vector Store.
- Implementing RAG: we will implement Retrieval Augmented Generation (RAG) using our Vector Store and Ollama.
- Building a UI: we will add a simple, user-friendly web-based UI for our application using Streamlit.
Can’t wait to try the whole application out? Check out the SWLWi Github repo.
Thanks for your time and attention, and see you in the second part!